Making a haste to edit a photo should not be a question of quality and cost. Be it the bold headline to a product image, to resize a photo to a site, or to perfect a graphic to a social media, the correct free online photo editor is capable of doing all that and does not need a subscription or the installation of a software. This guide will take you through what to seek, how to maximize these tools and what features to really expect at no cost.
The reason behind the great number of people moving to free online photo editors.
The argument of photo editing via a browser has never been more compelling. Decades ago, significant amendments demanded desktop applications which were time consuming to install, learn and maintain. More online applications are providing increasingly functionality that previously was the prerogative of paid applications, all in a browser window. No download, no version issues, no storage load on your device.
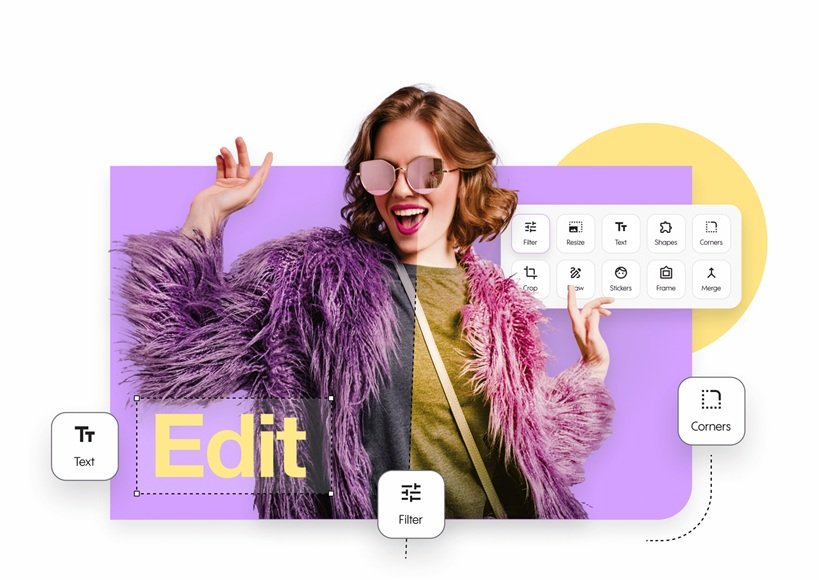
The free online tools suffice to cover the most frequently used photo editing requirements, namely, adding text and resizing images. The trick lies in understanding how to assess a tool, before you spend time learning it and how to make it work once you learn it.
What to Expect of a Free online Photo editor.
Not all of the tools that define themselves as free provide the same experience. Others have large free plans that have almost all features. Unless you upgrade, other people impede the most useful features. Prior to investing in any tool, make sure it satisfies these minimum requirements without a paid plan:
- The common types of photos that you can upload are JPG, PNG, or WEBP.
- The image can have text added, formatted and placed freely.
- The picture can be resized with custom pixel or percentage.
- The completed file will be downloaded without a watermark.
- There is no basic use account that needs an account or the free account is simple to establish.
The tools that satisfy all the five criteria in the free version are worth your time. Anything that does not pass the watermark or download requirement, must be treated with care.
Top 10 Ways to get more out of Free Online Photo Editors.
Set Your Size And Not Last.
The tendency to consider the size of the images as the end, but not as the beginning of the workflow is one of the most widespread workflow errors that happen during online photo editing. You will run the risk of compressing or stretching elements that are created to be of other proportions when you resize at the end of a session. The majority of free online editors allow you to specify output size upon uploading, or to create a blank canvas of a given size and then add anything.
When you begin with the right dimensions all your elements (text and overlays) are scaled to the end result. This is of particular importance to the platform-specific content such as social media posts or website banners, where the exact dimensions influence the way they are rendered on the devices.
Reliable Free Editing with Adobe express.
Adobe Express is among the best places to begin in case the user has a need to have a free online photo editor with powerful features and a user-friendly interface. The photo editor Adobe Express is web-based and does not need software. In the free plan, you receive access to text tools, image resizing, templates and design assets, without a watermark on what you download.
The Adobe Express is distinguished by the quality of the design infrastructure. The font library, template system and asset collection are designed to professional level and it is easy to create professional content in a short time. It is device compatible and projects are saved in the cloud, which means that it is easy to resume an edit in the future.
Select the appropriate Font to the Situation.
Font choice conveys tone when text is added to a photo, prior to the reader interpreting the words in the text. A bold block typeface exudes authority. A flowing script is indicative of warmth or creativity. A san-serif is clean and looks contemporary and friendly. The none of them is always right or wrong, but each right or wrong in a certain context.
Free online photo editors are of different font libraries in terms of size and quality. Test the fonts it has before committing to using a tool regularly, to ensure it has the fonts you need to use on your content. Note whether the tool can pair fonts, where a headline and subheading can be of different types in the same layout because this can be visibly different in the quality of the finished work.
Check the Aspect Ratio Each Time you Resize.
Almost anything that tries to resize a photo without the aspect ratio being locked is bound to go wrong. The proportional relationship between the width and the height is the aspect ratio, which makes people appear like people, and not stretched shapes. Any legitimate free online photo editor will allow one to lock this ratio, usually a padlock symbol in the proximity of the fields of dimension.
Before modifying any dimension value, make it a routine to ensure that the lock is on. To make your image fit into a space that has different proportions than the original image, first crop to reframe into the correct proportion, and then resize to the desired proportions. It is an attempt to get the resize to do the work of the crop which brings about distortion.
Work in Layers, to make your design flexible.
A large number of online photo editors are free, and have a layered workflow, with text, shapes, and other items overlaying the underlying image instead of integrating with it. Layers are useful in that they ensure that each of the elements can be adjusted separately until you are ready to export. You can drag text without affecting the image under it, change colors on a shape, and can even experiment with positioning, without commitment.
In case of a tool that supports layers, get in the habit of working in them deliberately. Items that pertain to the group and can be exported as the tool permits and the last step instead of a step in the middle of the session.
Insert Text Where Already the eye goes.
Proper text placement in photo editing is concerned with where viewers focus their attention initially and then taking advantage of that inherent attention movement to your message. The eye of the viewer moves to the main subject in most of the photographs and then shifts to areas with high contrast and then finally rests on the negative space around the subject.
The text is usually most easily read in the negative space of an image, where there is no well-formed visual information, like a clear sky, a smeary background, or a flat-coloured surface. In case your photo lacks any apparent negative space, you can create it by adding a semi-transparent block of color or a soft gradient overlay behind the text. This method addresses contrast issue without blurring the original picture.
Export at the Right Resolution to your Use Case.
One of the most misconceived parts of image editing is resolution and an image can be easily ruined by exporting it in the wrong setting without realizing it. A standard resolution is 72 to 96 pixels per inch in case of images on screens. In the case of print, the professional standard is 300 pixels per inch.
In addition to resolution, file format is important. PNG can be used in graphics with text or flat color portions since it has sharp edges with clean edges. JPG is more appropriate in photographs where the advantages of file size are more important than the slight quality loss. WEBP export is now supported by some free online editors, and is capable of producing high quality at smaller file sizes, and is becoming supported on major platforms.
Make Use of Spacing and Alignment Tools.
Photo editors created as free online tools with design in mind will most often have alignment tools allowing you to snap elements to the center, or the sides or a grid. These are tools that you can easily ignore when you are in a hurry yet it is the distinction between a design that appears intentional and one that appears slightly out of place.
When inserting some text on a photograph, aligning tools must be used to keep items in the right location as opposed to dragging them manually. Mathematically centered text should not be more or less centered. Left aligned text must be aligned with other left aligned objects. The alignment tool takes a few seconds to use and the visually enhanced output is instant.
Save Time by using Template Starting Points.
Beginning with a blank canvas to design is not necessarily the most effective. Depending on the type of content, most free online photo editors have a collection of ready-made templates that are sized to fit the typical content: social media posts, email graphics, flyers, and more. Templates are pre-solved layout and proportion base points, you simply have to add your own images, text and branding.
With a template, the first step is to replace your own photo, and then modify the text to say what you really want, and change colors as necessary. This systematic process helps to ensure that the template does not get lost in the sense that its original logical design is lost.
Export Before Saving an Editable Version.
An error that wastes actual time is to have a finished image exported as a JPG or PNG and then you realise that you have to make an adjustment. The layers are flattened, the text is not editable any more and you are starting over. The majority of free online photo editors provide an option to save the work in the native format of the tool, allowing to retain all the editable aspects to be used in the future.
Consider the export as being a last resort that you made when the design is finally ready. Before clicking on download, save the project file, or have the tool automatically save it to your account. Unless the tool you are using offers the possibility of saving your project in the free tier, it is good to know that to be able to schedule sessions around it.
Creating a Repetitive Editing Process.
After identifying an online photo editor that is free and that suits your requirements, you will only need to create a consistent workflow around it, which will enable you to work efficiently on a session-by-session basis. A dependable procedure to insert text and increase pictures could resemble the following:
- Determine the destination of the output and the proper dimensions.
- Configure the size of the canvas or upload at the target size.
- Perform base photo editing like cropping, or brightness.
- Insert text items, beginning with the main message and then proceeding to supporting information.
- Placement of review, contrast, font, and alignment.
- Staircase preview to emulate mobile or thumbnail preview.
- Save the project file (editable).
- Export to appropriate format and resolution.
This flow process will always minimize mistakes, increase the speed of the production process and maintain the quality of output even during a rush.
Last reflections on how to find and use the correct tool.
Free online photo editors have now achieved a quality level that it is a true first choice, and not a final option when users cannot afford a paid application. In the functions of greatest interest to the vast majority of users, which are adding text to pictures and setting them to a certain size, the free tools can perform, quickly, and become more and more refined.
This guide strategies are applicable in the majority of free platforms, yet the outcomes will always be based on the intentions with which you are undertaking each session. Beginning with the correct dimensions, knowing where to place text, aspect ratio lock, and editable files to save before exporting are things that get better with practice. Whether you produce a single graphic each week, or dozens of graphics every day, these practices are the best way to ensure that you produce work that is consistently professional.
FAQ:
The most appropriate option will be based on the amount of work you require and the frequency. Users seeking a professional level of free functionality can find one of the most fully-featured collections of text features in Adobe Express, such as selection of fonts, size options, color options, and alignment settings at no cost.
The downsizing of a photo usually does not degrade the visual quality, and especially when using more contemporary browser-based image scaling algorithms. Scaling up is the direction that causes trouble since at higher dimensions the editor will have to produce pixel data not in the original file, which frequently produces a soft or visually blurry image. Upscayl
The majority of the internet-based photo editors are interoperable and can be used on tablets and smartphones. It is not the same to work on a small touchscreen as it is to work with a mouse on a desktop, especially when it comes to work where precision in placing or resizing the text is required.
Creating commercial material with the help of a free online photo editor is usually legal, however, the legal aspect of the matter is not the tool, but the assets one uses in it. The software license normally allows you to use commercial use of designs you make. This is a problem with photos, fonts or templates in the asset library of the editor, which usually have their own licensing conditions. Others are completely licensed to be used commercially.